Part 2 of this intro to oil painting tutorial walks you through every step of the process to paint a lobster in a still life. Watch Part 1.
- 30 second short (palette knives)
- 1 min. short (oil mediums)
- 1 min. short (filbert brushes)
- 4 min. video (cleaning brushes)
- 3 min. video (glass palettes)
- 3 min. video (glazing)
- 1 min. short (brush sizes)
- 1 min. short (brush cleaning tanks)
- 1 min. short (storing paintings)
- 71 min. video(tutorial part 1)
- 38 min. video (tutorial part 2)
- Guerra Paint playlist


Prof Lieu talks about how to premix your colors with a palette knife, lighting & shadow, brush techniques, how to layer your oil paint, the differences between opaque and transparent paint, glazing techniques, how to paint details, and more.
Video Walkthrough
- Seeing colors as a group
- Pre-mixing colors
- Squinting at the lobster
- Palette knife
- Lighting on the lobster
- Warm & Cool colors
- Mixing base colors
- Adding small quantities of color
- Mixing a shadow tone
- Mixing the highlights
- Sketching with paint
- Painting is not about accuracy
- Blocking in colors
- Painting the negative space
- Assigning 1 color to each brush
- Training your eye to see colors
- Tube wringer
- Don’t critique yourself as you paint
- Reinforcing the lighting
- Glazing (transparent paint)
- Opaque vs. transparent paint
- Dry brushing techniques
- Painting details
- Is the painting is done?
Prof Lieu’s Tips

I think the thing about palette knives is that they’re just a really awkward tool, so if you don’t have someone right there showing you how to use it, it doesn’t make a lot of sense!
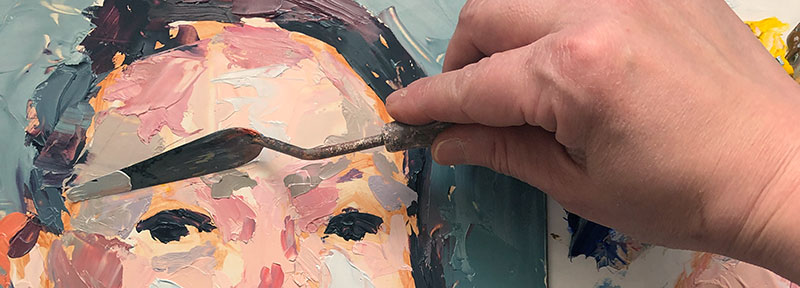
There’s no “correct” way to hold it, just that you have to press down.
So what you’ll see me do in a lot of the demos is I am pressing down to mix, and then I scrape up what I have mixed with the side of the palette knife so the color doesn’t spread all over my palette.
Art Supplies
Oil Medium Recipe
- 1 part linseed oil
- 1 part stand oil
- 3 parts Gamsol (or another solvent)
Oil Paint Colors
Get the art school training you never had
Stop making art all by yourself! Create art you can feel proud of in Art Club and get out of a rut quickly with our staff of 6 professional artists.
As a free educational source, Art Prof uses Amazon affiliate links (found in this page) to help pay the bills. This means, Art Prof earns from qualifying purchases.


