This video is a step by step drawing demo of soft pastel techniques for drawing a scene of a table setting with a dish, napkins, and glasses.
The development of the drawing is explained from scratch.
- 1 min. short (pastel brands)
- 67 min. video (draw along)
Prof Lieu explains in depth the technical aspects of the drawing process and the creative decisions that are made along the way. Demo led by Art Prof Clara Lieu.


Video Walkthrough
- When you start a drawing, it can be helpful to identify what goals you have for that drawing before you start.
- The goal for this drawing was to stay more abstract and loose as a contrast against the more rendered and detailed colored pencil drawings.
- Soft pastels tend to perform better on pastel or charcoal paper which have a slight tooth that “grips” the powder more effectively.
- Regular drawing paper doesn’t have a tooth and therefore the soft pastel tends to “glide” across the surface.
- Ampersand Pastelbord is a terrific surface because it’s a rigid board, making it much more durable than the average pastel drawing on paper.
- Ampersand Pastelbord has a coarse surface, similar to a very fine sandpaper and comes in toned neutral colors as well.
- Often the reason people are struggling with soft pastels is because they don’t have enough layers on the paper.
- Starting the drawing by smearing a layer of pastel colors in order to create a more suggestive, atmospheric environment.
- Blocking in colors in the background and negative space helps define the objects and space better.
- The outdoor lighting in this scene made for a lot of really diverse lighting situations that aren’t possible indoors.
- Drawing with the side of the soft pastel enables you to cover large areas of the drawing more quickly.
- Drawing patterns can be very challenging, it’s a lot of detail and color packed into one area.
Prof Lieu’s Tips

The pacing of an artwork is so hard when you’re at that point where you COULD say it’s finished, but there is also some room to keep going.
I would say that 99% of the time when students have told me they are finished, I still think they can put in another 2 hours. When I taught at RISD, it would take me most of the semester to get student to understand what it meant to really finish the artwork.

I tell students to make a “sacrifice” drawing; decide in advance that you’re doing to kill the piece on purpose, push it waaaaaay further than they think is reasonable. Most people haven’t had the experience of going too far.
The thing is, once you have gone too far it’s easy to pull back and find that sweet spot. Otherwise, people inch closer incrementally towards the finish and it’s really slow. Better to take a gigantic leap and then you’ll know what’s too much!
Art Supplies
Materials provided by
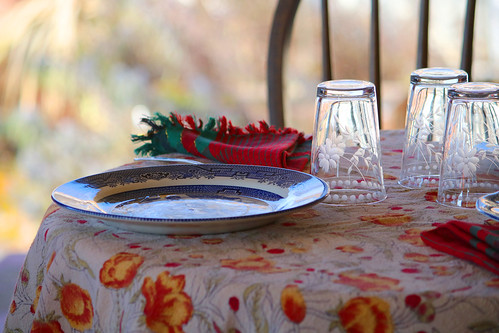
Reference Photo
As a free educational source, Art Prof uses Amazon affiliate links (found in this page) to help pay the bills. This means, Art Prof earns from qualifying purchases.