Prompt
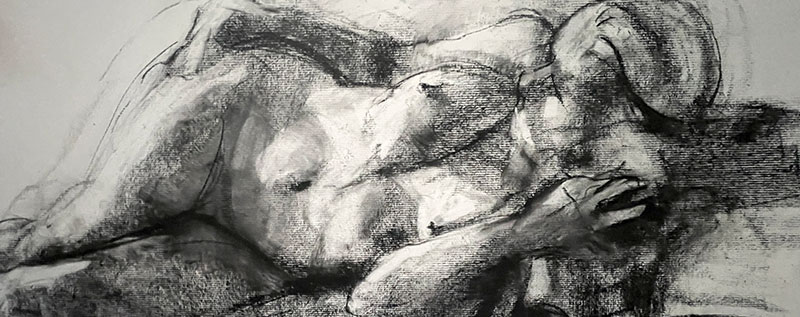
Draw 6 hours of 5-20 min. gesture drawings of full figures that emphasize tone to show the volume and form of the human figure.

Think about the process as if you were sculpting a figure in 3D. Muscles are rarely confined to a single point of view, many “wrap” around the figure from one side to another.
Line & Tone
The idea with this exercise is to cut down on the amount of line in your drawings so that the tone has more of an opportunity to have a greater presence in the drawing.

Often we get really caught up in defining the figure with line that by the time tone is introduced, the line has done all the work.
Consequently, the tone often ends up as filler that gets “colored in,” as opposed to being used in a more structural manner.

Stage 1
Choose your reference photo, this Google Drive folder has full figure, nude reference photos which have lighting situations that are easier to see.
If you don’t have a lot of experience with lighting, it’s really worth exploring our lighting section.
The discussions on shadows and highlights break down how light works.

Stage 2
Start your drawing with only tone, no lines! Use an art material where you can block in wide marks with the side, like crayon, a graphite stick, or charcoal.
Note how the charcoal allows you to block in wide, chunky marks. Push your marks in all different directions. The tone has a chance to “shine,” because it’s introduced before the line.

Stage 3
Do a pass of lines right on top of the tone to start to “pull out” and define the figure more concretely within the tone.
You’ll have to make tons of adjustments and changes, don’t be afraid to move an arm over 2″, make the head much smaller than you initially drew it.
Tweaks are much easier at this early stage!

Stage 4
Use a stiff eraser, (like a Mars Plastic Eraser) and block in the biggest highlights you can see.
Make adjustments and move things around as you eraser, be willing to make dramatic changes.
Keep your eraser marks very simple and straightforward, now is not the time to work on nuances in the tones.
Examples
Artworks by Toaster, Anastasia, Neil, Pat, Tent, Steen

Tips
Consider the balance between line & tone. Tone is not there to simply “color in” the lines, consider how you can let line and tone be equal partners in your drawing.
A good way to ensure that tone gets the chance to shine is to stop drawing lines much sooner than you think you should, and to jump into building up the tone.
If your line drawing becomes too involved, there won’t be any space for the tone to really establish a presence.

Your drawing will feel quite mushy and vague for a while you build up the tone in stage 1, that’s normal! Go back and forth between line and tone while you develop the drawing, you probably don’t need as much line as you think you do.
related anatomy lectures
Reference Photos
Timed Drawing Videos
Practice with our timed drawing videos! Get your drawing supplies and follow along as each pose plays with a timer. See all the timed videos here.

art media
Use any traditional or digital art medium. For traditional media, try to avoid media that don’t allow for a range of widths in your marks, like a mechanical pencil or ballpoint pen.
Drawing media like Conté à Paris Crayons are helpful because you can draw with the tip for thin lines and the side for broader strokes of tone.

SUPPLY LISTS
Visit these pages for specific supply lists: colored pencil, conté crayon, graphite, soft pastel, oil pastel, pencil, charcoal. Explore a comprehensive list of all drawing supplies in Part 1 of our Drawing Curriculum.
paper
We recommend not working in your sketchbook, as drawing too small will make it too hard to emphasize tone in your drawing. Paper that is about 12″ x 16″ up to 18″ x 24″ is ideal.

Recommended traditional art media
Caran d’Ache Neocolor I Crayon, General’s Woodless graphite pencils, Conté à Paris Crayons, Vine Charcoal
Recommended software
Procreate, Krita, Adobe Photoshop, Clip Studio Paint, Paint Tool SAI, Adobe Fresco, MediBang Paint, Gimp
Gesture Drawings in Tone
This video is a drawing demo of 2-5 min. figure poses, doing gesture drawings that focus on using large areas of tone to articulate the forms in the human figure.
The anatomical structure is emphasized through the major masses (head, rib cage, pelvis, thighs) and the centerline on the front and back of the figure. Demo led by Art Prof Clara Lieu.
Proportions for Figure Drawing
This video explains & demonstrates how to draw convincing proportions when drawing the human figure.
Techniques for figuring out proportions in the drawing process are explained in detail, as well as the basic anatomical relationships of the largest parts of the human figure. Demo by Art Prof Clara Lieu and Teaching Artist Cat Huang.
- Video walkthrough & more
- Watch the 4 min. version
- Watch the 80 min. version
As a free educational source, Art Prof uses Amazon affiliate links (found in this page) to help pay the bills. This means, Art Prof earns from qualifying purchases.


